Goodbye DirecTV, Hello FiOS TV!

— Be Sure to Check Out My Newest Verizon FiOS Update Here

It’s official. I’m no longer a DirecTV subscriber. Verizon came out and installed Verizon FiOS TV and Internet at my house today. Here’s my initial review of the service.

The two installers arrived at 3:30 pm, which was right in the middle of the 1-5 window Verizon gave. The whole process was done at abour 6:45, which was a little under the 4-6 hour installation time they told me to be prepared for. The installers were very friendly and knowledgable. They had no problems throughout the entire installation.

Here are a few pictures of the Optical Network Terminal (ONT) and battery backup:

FiOS ONTFiOS ONT Open
FiOS ONT Close UpFiOS Battery Backup

For the internet service, they ran a Cat5e cable from the ONT along the outside of my house (hid just underneath the roof overhang) to my office, which connected to the wireless router they provided (D-Link DI-624). They used my existing coax cable, that previously ran to my Comcast Cable modem, to connect to the Network Interface Module (NIM, Model – Motorola NIM100). The NIM is required to access Video-On-Demand and Pay-Per-View shows. Also, I believe the NIM will one day be used to watch DVR recorded shows from any Set Top Box (STB) in the house. This feature is not yet enabled, and I really hope they enable it soon. Here are some pictures of the router and NIM:
FiOS NIM and RouterFiOS TV NIM

The installers told me that the “Cable Out” connection wasn’t enabled. But that’s not true. I connected a small tv in the office to the connection and I was able to access the basic cable channels (about 15 channels).

Now on to the DVR. The DVR STB provided by Verizon is a Motorol DVR QIP6416-1. I was surprised that there was only one RF input. With the DirecTV system, there was an input for each tuner. This unit is able to record one show and watch another. It comes with a 160GB hard drive. They provided a component cable, but I connected it to my tv with an HDMI cable. Here are some pictures of the unit:
DVR FrontDVR Back
DVR Front LeftDVR Back Center
DVR A/VDVR Back Right
FiOS DVR Remote

Overall, I’m very impressed with the DVR. My first DVR was an Ultimate TV. The Motorola system is Microsoft based, so it is very similar to what I was used to with that. In comparison to the HD DirecTivo that we were using, I’m much happier with the new Verizon DVR. The DirecTivo was very slow switching from tv to menus. I also really like being able to set up a series to be recorded by pressing record twice in the guide. It was a hassel having to jump through multiple menus in DirecTivo menus and then sitting there waiting for about 45 seconds for it to decide it was ready to go. The Verizon DVR is almost immediate when you press record.

Overall, the Verizon DVR is superior to the HD DirecTivo in almost every way. I liked being able to pause one live show and then change tuners to watch another channel with Tivo. I can do this in theory with my new one by recording two shows, but the functionality of the DirecTivo was a little better. The other way the DirecTivo was better was the look of the guide and the menus. The fonts were easier to read and looked a little more current. The Verizon makes up for it, however, by being able to see a thumbnail of the show you’re watching when you’re in a menu. It’s worth the trade-off. Here are some comparison shots between the two.

The biggest flaw of the DVR is the lack of any sort of Wishlist feature. I assumed it would have one, since UltimateTV had it, but I assumed wrong. I never used it on the DirecTivo though, so I won’t really miss it.

Channel View:

FiOS ChannelDirecTivo Channel

Guide:
FiOS GuideDirecTivo Guide

Recorded Shows (Now Playing List):
FiOS Recorded Shows ListDirecTivo Now Playing List

Scheduled Series (Season Pass Manager):
FiOS Series ManagerDirecTivo Season Pass Manager

Menu (DirecTV Central):
FiOS MenuDirecTivo Menu

One menu that DirecTivo doesn’t have is Verizon’s Mini-Guide. Here’s a picture of that:
FiOS Mini Guide

Overall, I’m very pleased initially. Normally when I buy a new gadget or service, I’ve built it up so much in my mind that I’m somewhat disappointed. That didn’t happen with Verizon FiOS. I’m really happy with the channel selection. The only channel that I know I don’t have anymore is OLN (and I don’t watch NHL games or the Tour de France, so I won’t miss it). They also don’t have the NFL Sunday Ticket or NBA Season Pass (that I know of). So if you’re tied to those, you’ll be let down.

The biggest factor that motivated my to switch was the HD channels. Verizon offers all of the local broadcasts in HD and national HD broadcasts as well. I’m happy to now have TNT HD for NBA games (would’ve been nice to have Thursday night when the Mavs were on). The picture quality for the HD channels is at least as good as DirecTV was, if not slightly better. I haven’t noticed any difference in the standard channels.

The other feature I like a lot is the VOD. There are a BUNCH of free shows in from different categories. I like the sports options they have most. There are also selected music videos available. The movie selection is pretty good too. There are quite a few new movies (new to DVD, that is) available, such as: Batman Begins, Cinderella Man, Madagascar and a lot more available for $3.95. They also have a fairly extensive selection of older movies available for $2.95. Once you choose a movie, you’re able to watch it for up to 24 hours.
You can read more about FiOS TV from Verizon’s website. If you have any questions about the service, please comment and I’ll respond.

—Response to DylanE—
I notice in the screen shots that you are using the “grid guide” for both TiVo and Verizon DVR. Any chance that the Verizon DVR has a guide view closer to the normal TiVO style?

I never knew there was a different guide with Tivo. Maybe it wasn’t available with DirecTivo. If the normal Tivo guide style you’re talking about is the one that lets you view all the upcoming shows on a particular channel in the guide then yes–in at least a similar way. In the guide, if you highlight and select the channel it will show you the upcoming shows on that channel.

— Response to Fred —

2006-1-30 @ 3:01:01 pm
How does the season pass manager handle sports teams with games being on different nights and times? Is it able to do that?

From what I can tell, there is not a season pass type function that will automatically record based on specific criteria. You can seach for the actor/team name, but you have to manually choose to record from the search results.

Linux Distribution Screencasts

This is probably the best site I’ve seen that gives you an inside look at Linux. LinClips.com is a Linux resource which illustrates desktop Linux distributions through screencasting. Each distribution video clip is approximately two minutes in length.

What I like best about the site is that you don’t have to download and burn a Live CD/DVD to see what it’s like. If you’re just curious what Linux is all about, this is a good place to start.

read more | digg story

GameStop.com is Screwed Up

I had my hopes up yesterday that I would actually get an Xbox 360 soon. GameStop.com had the Xbox listed as available and in stock for a few minutes last night. My brother called me and I placed my order immediately. Everything looked fine until we checked our order status later. Backordered. Crap. That didn’t look good, so I called them this morning, and after waiting on hold for 19 minutes I talked with a CSR who told me it was backordered until MARCH!!! I immediately cancelled. Little did I know there was something more going on. While I was on hold, GameStop.com had sent an email basically saying my order was cancelled due to a glitch that allowed people to access the product that was not available. Here’s a copy of the email:

From: SpecialOffers@gamestop.info
Subject: Important Message About the Xbox 360 Order You Placed Yesterday
Date: Thu, 15 Dec 2005 11:36:15 -0600

Dear GameStop.com Customer:

Unfortunately, without our permission or knowledge, someone determined a method to view product pages of unavailable products via our URL link format. This link was then distributed on several web sites and message boards. The Xbox 360 Premium Bundle ($399.99) you ordered yesterday was not publicly listed for sale or available on GameStop.com, including on our search and Xbox 360 pages. We are taking steps to identify this individual and will work to ensure this does not occur again.

As this product is unavailable and was not intended for sale, we must regretfully cancel your order. Along with our sincere apologies for this unfortunate incident, please accept the attached GameStop.com coupon good for $5.00 off any purchase of $25.00 or more.

Sincerely,

GameStop.com Customer Service

Coupon Code: ************

This GameStop.com coupon expires December 31, 2006

They need to get their online ordering act together. Why would you have a listing for a product you didn’t plan to sell?

Tech Tip – Backing Up Important Files

One of the least reliable computer devices ever was the 3 1/2″ floppy disk. I know that I personally lost a few files from bad disks and people in college were losing files all the time. It was a bad technology. That’s one of the problems with disks . . . they can break. So, what should you do to back up your files? Here are three suggestions:

1 – Burn them to CD/DVD
Most computers today have either a CD or DVD burner. With CDs, you can back up probably all your documents and a lot of pictures to one disc. If you’re planning on backing up a lot of pictures or mp3s you’ll want to have a DVD burner since they hold a lot more data. This is a good solution if you have a lot of school papers or other important documents that you want to keep safe. A downside to this solution is that discs can scratch or get lost. You want to make sure you write what you copied on to the disc after the burn is complete. I can’t tell you how many CDs I have that I have to stick the in drive to figure out what I put on it.

2. Copy them to a USB Drive
Some of the newer storage devices are USB Flash Drives (also known as “Jump Drives”). These little devices have really grown in popularity over the past year or two. They are small enough to fit in your pocket and sometimes are able attach to your key chain. They come in various storage capacities, with the most popular being 256 MB, 512 MB, and 1 GB. One of the best things about these little drives, besides their small size, is that there are no drivers required. Which means you can plug them right into a USB port on any computer (PC or Mac) and it will be ready to go in seconds. This option is really good if you’re moving back and forth between multiple computers and are working on larger or multiple files. One downside is they are easy to misplace due to their small size. Another problem with them is their key chain attachment. The two that I’ve owned have either had the cap break or has fallen off and gotten lost. Other than those two problems these little devices are great pieces of technology.

3 – Email the file to yourself
One of the quickest and easiest backups is to email the file(s) to yourself. With the increased storage size with the free email accounts (gmail, yahoo, hotmail) and bigger attachment sizes this has become, in my opinion, the best way to backup your files. All you do is send an email like you normally would, but address it to yourself. I’ve used this method probably a hundred times. You probably don’t want to save any financial records or other sensitive personal information this way, just to protect yourself from the chance of your mail provider’s servers being hacked, but for everything else I recommend this. What I like most about it is that it gives you an off-site, non-physical (at least to you) backup of the file. The importance of this is important to understand. You could have the file(s) saved to your computer, laptop, CD, and jump drive, but if your house burns down and all of these burn with it, you’re out of luck. This option protects you from even fire.

If you have any other ideas for backing up files, please leave a comment.

Tech Tip – My New Favorite Firefox Extension

I’m starting to think of Firefox as the best browser ever. Every now and then, I find something new that blows me away. This happened again with an extension called IE Tab. Its website describes the extension this way: “This extension is derived from the famous extension IE View, but they are quite different. While IE View always open IE-only pages in newly launched windows of Internet Explorer, IE Tab can open them in tabs of Mozilla/Firefox.”

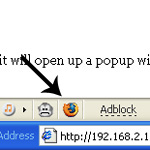
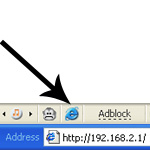
The reason I like it so much is there are some sites that don’t look right in Firefox. IE Tab load Internet Explorer in a Firefox tab!!! This means you don’t have to open up IE, type in the address, and wait for it to load. You can either right-click on a link and choose “Open this link in IE Tab” or you can click the icon at the bottom that shows you what web engine you’re currently using (see pictures). This is really helpful if you run a website, blog, or list items on eBay!!!

Check it out at the Mozilla Update page.

Tech Tip – Save Money on Ink

A lot of people are unnecessarily wasting money every time they print something. If you have an inkjet printer (which is the most popular type of home printer) you probably can print in either color or black and white.

By default, most printers are set to print in color at the medium quality level. What that means is if you’re viewing a website (using Firefox, of course) and click the print button the printer will by default shoot out the page in color. I don’t know about you, but I can read maps and emails just fine in either color or black and white.

To change the default setting for your printer, click on Start > Control Panel. Double-click “Printers and Faxes” and look for the printer you use. Right-click on the printer and click properties. Each pinter is a little different from here, but it will be something like preferences or options that will allow you choose the default print quality (I suggest putting it at the lowest setting) and color (set it to black and white or gray-scale).

If you’re not happy with the settings after a few printouts, feel free to change the settings. You can also choose these same setting every time you print. Again, it’s a little different for each printer, but if you click on the File menu then Print, you should be able to access the quality and color settings for each individual print job. That way if you’re printing out some pictures or anything you need in color you can get it the way you want.

Bottom line, set the defaults to how you normally like things to print. If you mainly print pictures you’ll want the quality to be higher and in color. But if you’re like me and use your printer for general, everyday printing you don’t need it to look its best.

If you have a tech tip you’d like to share or a tech question please comment.

Tech Tip – Make Windows Load Faster

One of the most annoying things about Windows is that over time it can become an overgrown, slow-moving behemoth. If you’ve owned your PC for any significant amount of time it’s very likely that Windows is running slower than it did when your first booted up. There are a few easy steps that can improve the overall performance of Windows and make it load faster.

One of the most important steps you can take is to defragment your hard drive. The information that is stored on your drive are sorted into small clusters. When you save a file or program to your computer, it’s broken down into clusters that potentially can be thrown all over your physical hard drive. What can slow your PC down is the hard drive having to jump all over the disc to load that file or program. Think of the needle of a record player having to jump all over the place to play a song (that illustration is for the older folks among us).

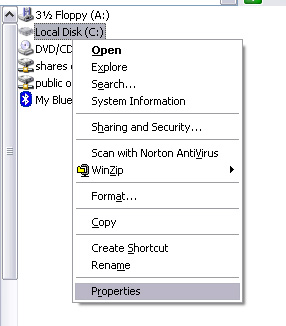
To defragment your drive, open My Computer (it’s in the Start Menu if it’s not on your desktop). Right-click on your hard drive (usually the C: drive) and click Properties.

Click the Tools tab (at the top) and then click “Defragment Now . . .” in the middle.

When the Disk Defragmenter opens, simply click Defragment. It’s that easy.

Another easy step to help speed up Windows loading is to manage what programs start automatically when Windows loads. To see what’s loading at startup, click Start > All Programs the right-click the Startup folder and click open. If you see any programs that you don’t use EVERY TIME you use windows, then there’s no use having them startup automatically. Simply delete them out of the startup folder. Don’t worry. You’re not deleting the program. You’re just telling Windows you don’t need them to load every time it starts up.

There are some programs that will startup even though they’re not in the startup folder. There are two ways to get rid of these. One is to right-click on the icon in the bottom-right of the taskbar and look for a preferences or options menu that might let you to disable it from automatically starting.

Beyond that, you can mess with the registry by running msconfig. You want to be REALLY SURE ABOUT WHAT YOU REMOVE from msconfig. If you’re not careful, you can really mess up Windows. If you’re not sure about something you see in msconfig you can find out information about a lot of things at ProcessLibrary.com.

All in all, these steps are some of the easiest ways to help improve your overall Windows performance. If you have any other suggestions or questions, feel free to comment.

Tech Tip – Keyboard Shortcuts in Firefox

If you haven’t started to use it yet, you need to make the switch to Firefox. In almost every way it is far superior to Internet Explorer. And it’s Free!!! The tabbed browsing is great and makes browsing multiple pages much easier.

I’ve recently discovered some of the keyboard shortcuts that make browsing even more easy. Here’s a few that I use almost every day (Sorry Mac people, I only know PC stuff):
New Tab – Ctrl + T
Toggle Through Tabs – Ctrl + Tab
Find in This Page – Ctrl + F
Select Search Bar – Ctrl + K
Select Location Bar – Ctrl + L
.com in location – Ctrl + Enter (example: type yahoo then press Ctrl + Enter and it automatically fills in http://www.yahoo.com for you)
.net in location – Shift + Enter
.org in location – Ctrl + Shift + Enter

There are many more keyboard shortcuts that might be more useful for you. You can see the list by pressing F1 in Firefox and then clicking “Keyboard Shortcuts” in the contents section. If you know of any other really useful shortcuts, please share them by commenting.